The Tech of Knee-Deep in Tech, 2022s edition - part 3
As a quick recap you might remember that the starting point for this step is the synced audio files from Riverside. As they are indeed synced, the tedious work I had to do previously to align the files is no longer needed. I am not missing that work at all…
Dealing with noise
Noise is everywhere. Noise can be something obvious as people talking loudly nearby, the drone of an air conditioning unit, to ground hum picked up from AC wiring. Some noise can be minimized, some might almost be completely removed. As always the key is to start with as clean a signal as possible, as there is only so much one can do in post-production. When it comes to handling noise on recordings from our respective home offices, things are fairly straight forward. Our equipment gives me very clean audio to work with, but if there is more noise than usual, or a guest has a less than ideal microphone, I still have the five seconds in the beginning for the noise reduction filter.
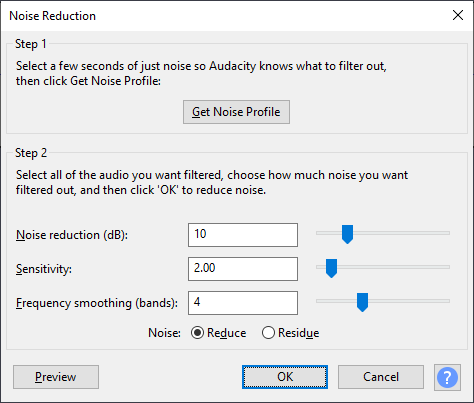
For starters, I will use the first couple of seconds to give Audacity’s noise reduction effect something to chew on. I select the first few seconds of quiet, go to the effect and click “Get Noise Profile”. This “teaches” the effect what to listen for. Then I select the whole track and go to noise reduction again, this time applying these settings and pressing OK:

I won’t go into details what all these mean, but I’ve found these settings to work nine times out of ten. Your mileage may vary. Repeat this step for all the tracks that need noise reduction. It is vital to “train” the plug-in (using get noise profile) on the specific track it is to work with to ensure the best noise reduction possible.
Post-production on audio we’ve captured from the field can be very different. If the noise in that recording includes a faint murmur of someone talking in the background, it is impossible for the noise reduction effect to know which voice to remove and which voice to keep. In essence, trying the same noise reduction trick like above can lead to very garbled and strange sounding audio. There is no perfect solution to this conundrum – you just have to experiment a bit with finding a setting that gives reasonable reduction of unwanted noise while keeping the recording as clear and normal-sounding as possible. In some ways, the faint background din is part of the charm of an on-site recording.
Compression and dynamics
Time for the slightly more difficult parts of post-processing. Most people have some variation in loudness when they speak, especially over an extended time (like, for instance, the 45 minutes of an episode). This variation in loudness is generally not that desirable. What we often wish to do is to amplify the quieter parts and bring down the louder parts to create a cohesive loudness all through the episode. There are several ways to accomplish this. One is compression, another is limiting, or a third could be using automatic gain control. If you’re unreasonably interested in how this actually works, take a look at Wikipedia here. In short, I use a combination of the built-in compressor in the GoXLR and a dynamic compressor in Audacity to handle both making the audio more uniform, but also to improve the general dynamics of the sound. However, I was never quite satisified with the built-in compressor results.
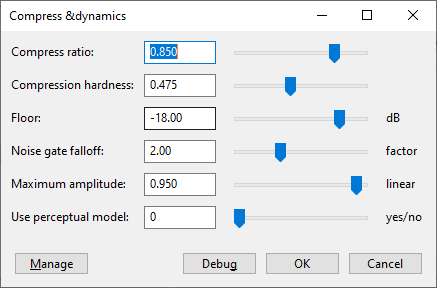
Then I was pointed towards a 3rd party plugin called “Chris’ Dynamic Compressor” which did wonders. The Audacity Podcast has a great set of starting parameters, and below are the numbers I’m running now.
I select the track(s) I want to apply the compressor to, set the parameters to the following and press OK:

Equalization
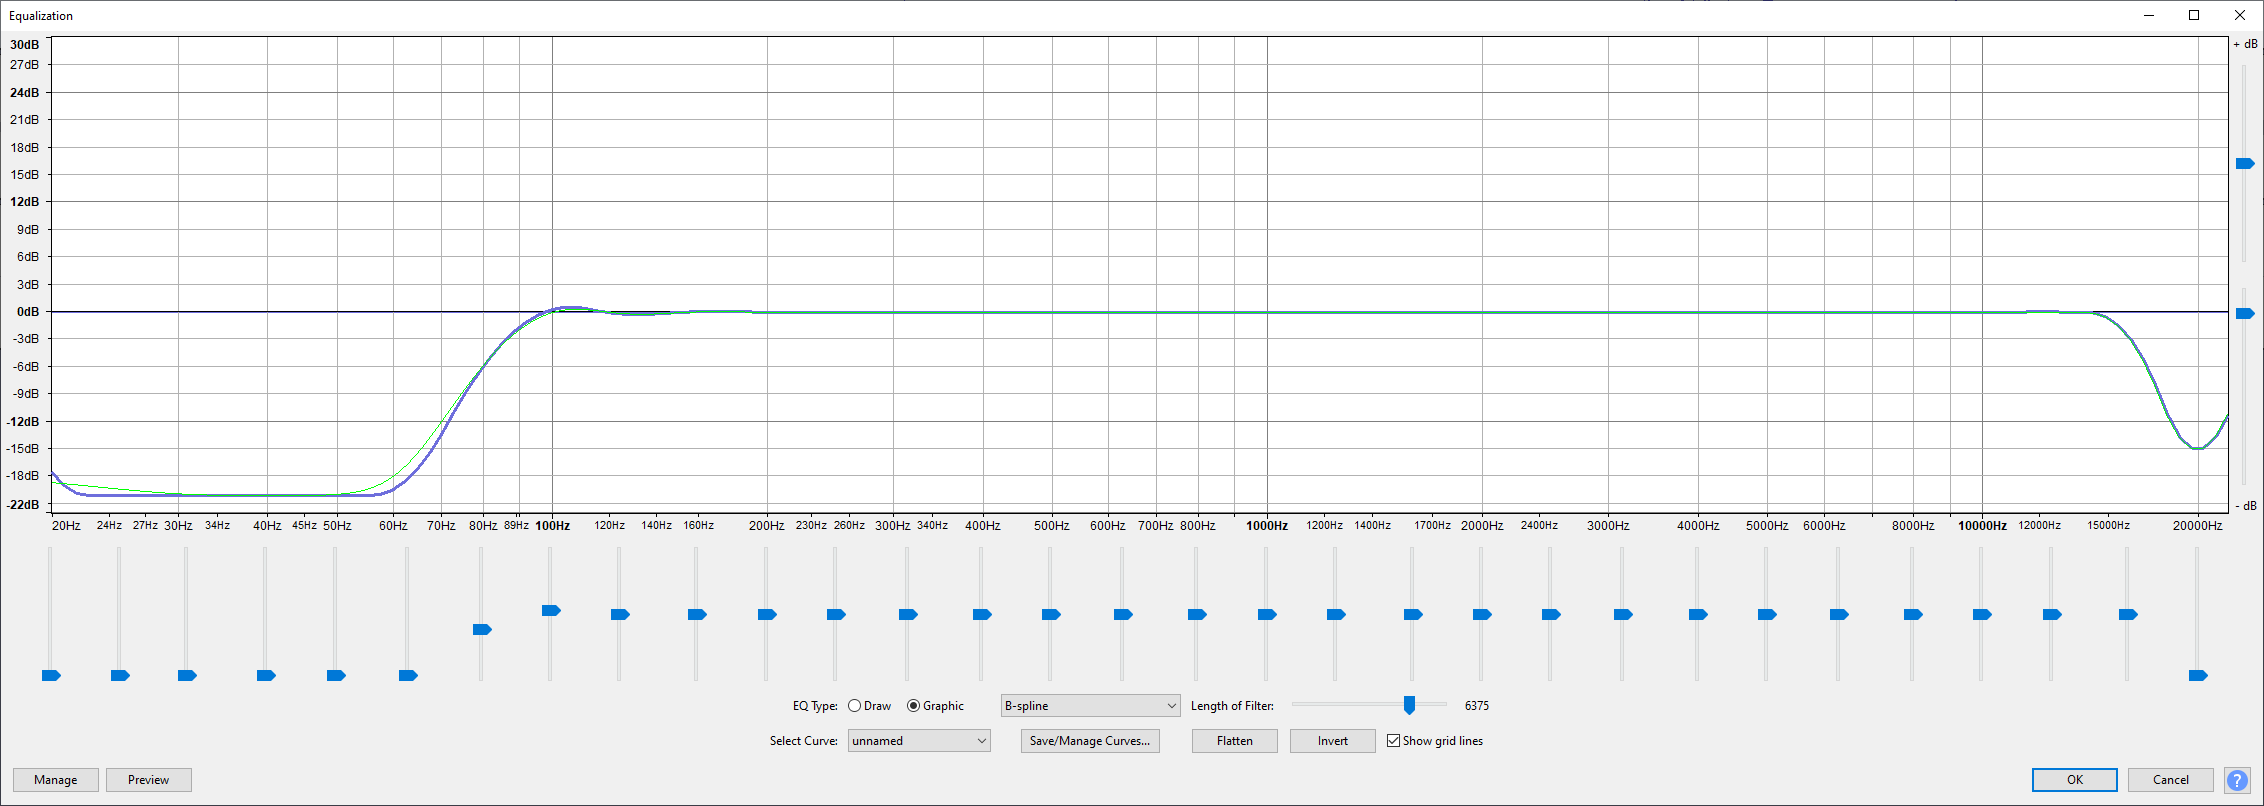
It’s now time to tackle unwanted frequencies. Again I won’t go much into detail as others have written about them in a much better way than I can (for instance the blog FeedPress here. I’ve created an equalization (EQ) curve in the equalizer plug-in that looks like this:

It’s somewhat hard to tell, but the bass roll-off is between 60Hz to 100Hz (a high-pass filter cuts out low frequencies that we want to avoid). Human hearing generally peaks around 15kHz, so that’s where I’m rolling off the top end as I don’t need that frequency range either.
This step can sometimes amplify and bring out noise that previously was hard to detect. I’ve found that Toni’s microphone has a tendency to be a bit noisy after this step, so in his case I throw in an extra noise reduction step just to clean that track even more.
Finally I cut out the dead air we used in the beginning of the recording to handle noise as that won’t be needed anymore.
Editing the audio
Time for the least fun bit – editing out all the “ummms…”, clicks, unwanted sounds, too long silences and such. This is the part that takes the longest as I have to listen through the whole episode to catch them. More obvious noises I might be able to spot in the waveforms in Audacity, but I don’t trust myself to always do so.
Loudness
The newest step in the chain came about when I grew tired of having episodes with varying volume. Technically they are varying in loudness, but the end result is that our listeners can’t listen to two episodes back-to-back without having to fiddle with the volumen knob. That had to go. Unfortunatly, this used to be a pretty involved step to crack, but as of the later versions of Audacity, it is way easier.
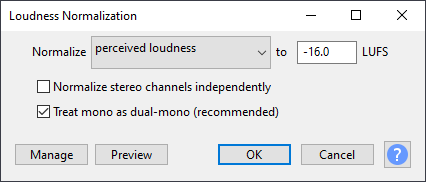
My target is -19 LUFS/LKFS for mono tracks. What the heck is LUFS or LKFS? Look here for an explananation of LUFS/LKFS for podcasters.
The new “Loudness Normalization” filter made this a breeze. Somewhat confusing is that I’ll be using a setting of -16 LUFS (despite just saying that I want -19 LUFS). This is because -19 LUFS for a mono channel will result in -16 LUFS in a stereo channel. Trust me - it confused me a while as well.

The end result is a set of mono tracks, all normalized to -19 LKFS/LUFS and this is both the unofficial “podcast standard” and a consistent number I can use going forward.
Mix, render and intro music
With most of the post-processing flow done, it’s time to mix and render the audio streams into one mono stream. I then add the intro and extro music files (already normalized to -19 LUFS like above). Shifting things around when I mix and render again, I’m left with a stereo file just about ready for public consumption.
With all the post-processing done I export the results as an MP3 file using the following settings:

Summary
Getting the audio to where I want it involve a lot of work. The final episode of 2019 is probably the one with the worst audio – ever. Audacity decided to record my Skype headset instead of my ProCaster. I only realized when we were done. That episode boils my blood to this day, and I vowed to never inflict such a crappy episode on my listeners ever again.
The steps I’ve gone through are the following:
- Download synced audio from Riverside
- Noise reduce
- Chris’ Dynamic Compressor
- Equalization
- Edit for silence, clicks, coughs, breathing, etc.
- Loudness normalization
- Mix, render and add intro and extro music
- Export to MP3
The only plug-in I use apart from what comes with Audacity is Chris’ Dynamic Compressor.
Phew. With that out of the way, the fourth and final part of this blog series will deal with getting the episode and word out!
