
The Tech of Knee-Deep in Tech, 2022s edition - part 1
Time flies when you’re having fun, and I’ve been thinking about writing a new post on the equipment, settings and workflow we use for the podcast. Suddenly it was 2022 and it was two years since I wrote the last series, so I’ll divide this one the same way.
Let’s kick off the first part of the series – the gear.
Recording on the move
When we’re at the same place to record (which is rare these days) or when we’re out and about and do interviews with people, we use a Zoom H6 recorder and AKG C520/C520L microphones.
The difference between them is that the C520L has a full-size XLR connector and the C520 has a mini-XLR connector. We use the Samson PM6 phantom power adapter to connect a C520 to the Zoom. We make sure to record all audio on separate tracks. These are condenser microphones that are highly directional and with an excellent, clean signal.
While the audio will suffer if we’re in a less than ideal recording space (lots of noise around us, a big, empty room with lots of reverb, etc.), I find that it the sound still is better with head-worn microphones than if we were using traditional microphones.
Having the microphones literally people’s faces reduce the risk of talking around the microphone as everyone is looking at everyone else during the conversation. This also avoid the need for bulky shock mounts and the like. The whole setup (Zoom plus four mics) breaks down and travels easily in a Thule Subterra PowerShuttle Plus padded bag.
For doing impromptu interviews on for instance an expo floor or on video, we use the Samson Go Mic Mobile. I have one handheld mic and a receiver, and Simon has one handheld, two belt packs and one receiver. We then pull the stero signal from the receiver into the Zoom H6 using the 3.5mm stero input on the Zoom X/Y microphone adapter. What’s nice with the belt packs is that they use mini-XLR plugs – the same connector that the AKG C520 microphone uses. Sometimes we just need two more channels quickly. In that case we bring out the Rode SmartLav+ lapel microphone. It connects (through a 3.5mm stero-to-mono splitter) to the 3.5mm input jack on the X/Y microphone.
In rare cases we don’t want the microphone to be overly visible. This we solve by using the Rode SmartLav+ lapel microphone connected to the Rode VXLR+ 3.5mm-to-XLR adapter. It features something called “plug-in power” that drives the lapel microphone just as if it was connected to a “normal” 3.5mm input jack.
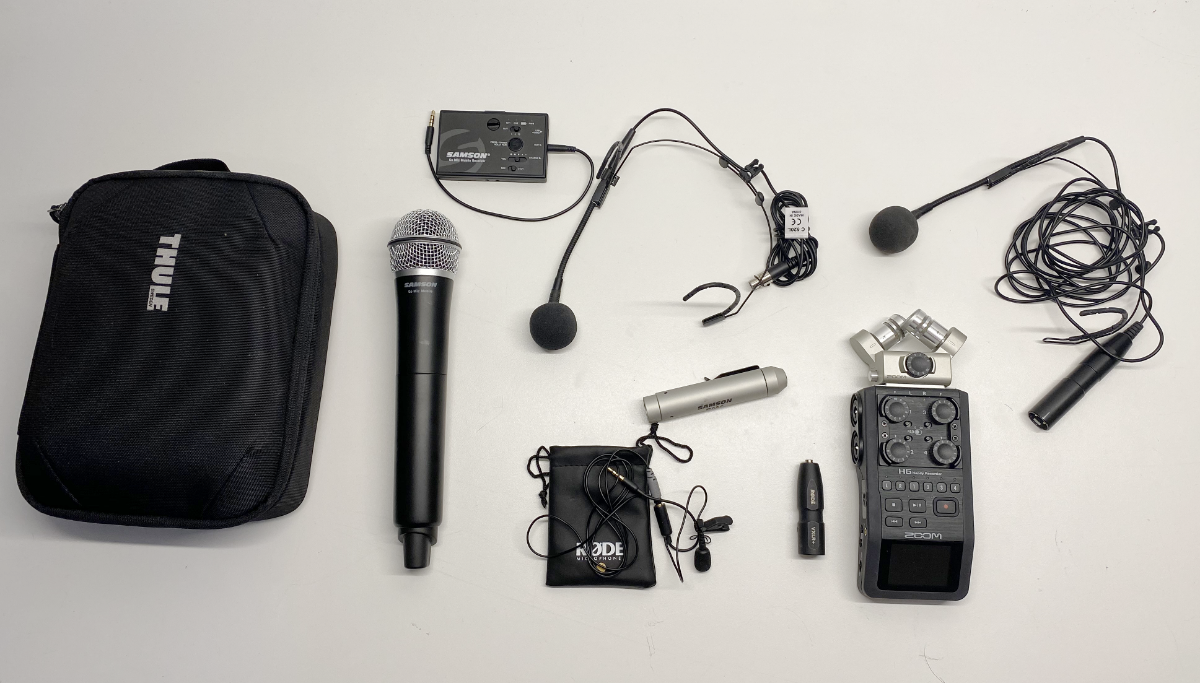
This image shows most of the components on the go.
Recording at home
As Heini’s in Finland, we have yet to record at the same physical place. This means we need to record remotely, and this took some thinking to figure out. More about that in the second part of this series.
We are currently three hosts, with almost the same gear:
Simon and I run the Rode ProCaster dynamic microphone. I have mine mounted on an Elgato low profile microphone arm, Simon is using a Rode PSA-1 arm. Heini has a Rode Podmic, also a dynamic microphone, mounted on a tripod for easy transport.
All three of us has opted to standardize our interfaces, and the choice was the GoXLR Mini. This box has really been the missing link for a lot of the stuff we do, and the onboard audio processing has made quite a difference for our sound - especially as neither of us has that much acoustic treatment (if any) in our respective recording spaces.
Microphone choice
Dynamic
A dynamic microphone is most often better for less than ideal recording spaces. This is due to how the microphone works and thus picks up characteristics of the room. One of the drawbacks of a dynamic microphone is the lack of a built-in amplifier. Some microphones require a lot of gain in order to produce a usable signal. Depending on the amplifier this can introduce more or less noise to the signal. The ProCaster is a “heavy” microphone in the sense that it requires a serious amount of gain from the amplifier to produce a usable signal. This generally results in noise as we are also in amplifying the inherent noise of the audio interface.
There are a few ways to combat this: The most obvious choice is to opt for a really clean amplifier/audio interface. “Clean” in this case unfortunately often means expensive. The GoXLR combines very good amplifiers with a great package and a decent price (at the time of writing some €150) and can easily drive even the power-hungry ProCasters. The PodMic is slightly less of a power hog, so the GoXLR has no issues with that mic either.
Conclusion
We spent a lot of time and effort on finding good equipment. My extremely good hearing makes me cringe whenever I listen to poor audio. I refuse to force crappy audio on people who choose to spend their time listening to our podcast. That’s why I will spend an inordinate amount of time and money to make sure the audio is as good as I can make it. There is only so much one can do in post-processing and having this gear helps a lot to ensure the raw audio is as good as we can make it. With great raw audio I have all the tools available to really screw things up in post-production!